

You will need
For adult-size chair
- 5 yards (4.6 m) medium weight to heavyweight fabric, 45″ to 48″ (115 to 122 cm wide)
OR 3-1/2 yards (3.2 m) of 54″ to 60″ (137 to 152.5 cm) fabric - Calico or similar, for inner lining, yardage same as for outer cover
- Polystyrene bead, approximately 6 cub. Ft. (1.85 cub. m)
- 1″(2.5 cm) grid, such as cutting mat or graph paper
For child-size chair
- 3 yards (2.75 m) medium weight to heavyweight fabric, 45″ to 48″ (115 to 122 cm) wide.
OR 2-1/2 yards (2.3 m) of 54″ to 60″ (37 to 152.5 cm) fabric - Muslin, for inner lining, yardage same as for outer cover
- Zipper, 18″ (46 cm) long
- Polystyrene bead, approximately 4 cub. ft. (1.27 cub. m)
- 1″ (2.5 cm) grid, such as cutting mat or graph paper
Cutting Directions
To make a full sized pattern for the sides use the printable pattern and transfer it to an actual size paper template. The squares on the pattern represent 1” or 25mm. Whilst the actual shape of the finished template is not critical it is important that it is symmetrical.
For the adult-size beanbag chair, make the pattern for the side pieces as above; cut six side pieces from fabric and six side pieces from lining. For the top of the chair, cut one circle each from the fabric and the lining, with the radius equal to 5-1/2″ (14 cm). For the bottom of the chair, make the pattern as in steps 2 and 3 below; cut two pieces each from the fabric and the lining. For the handle cut a rectangle 8” (200mm) x 12” (300mm) in the fabric only.
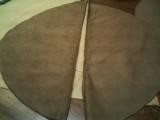
To make a template for the two parts of the bottom of the chair take a piece of paper and fold it in half. From the centre of the fold using straightedge and pencil, mark arc on paper measuring 12″ (30.5 cm) from marked point for adult-size chair. Cut on marked line.
Unfold paper mark a line 1/2″ (1.3 cm) from fold. Cut on marked line, and discard smallest piece of circle; remainder of circle is pattern for bottom of chair. Cut chair bottom pieces (2 off each) from fabric and lining.
For the child-size chair, make the pattern for the side pieces as above; cut six side pieces from fabric and six side pieces from lining. For the top of the chair, cut one circle each from the fabric and the lining with the radius equal to 4-1/2″ (11.5 cm). For the handle cut a rectangle 8” (200mm) x 12” (300mm) in the fabric only.
To make a template for the two parts of the bottom of the chair take a piece of paper and fold it in half. From the centre of the fold using straightedge and pencil, mark arc on paper measuring 10″ (25.5 cm) from the marked point for child-size. Cut on marked line.
Unfold paper mark a line 1/2″ (1.3 cm) from fold. Cut on marked line, and discard smallest piece of circle; remainder of circle is pattern for bottom of chair. Cut chair bottom pieces (2 off each) from fabric and lining
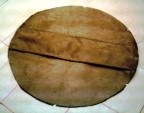
Bottom of bag with zip
Click Here for a Printable Pattern
How to Sew the Bean Bag
Chair Bottom
Sew zip to straight edges of fabric so as to form a circular base when zipped up. Sew two parts of lining material together (No zip) leaving an opening in the centre of approx. 6” (150mm) to fill with the polystyrene bead.
Stitch long edges of side pieces, right sides together, in 1/2″ (1.3 cm) seam.
Make handle by folding the rectangular piece of fabric inside out (making a rectangle 4” (100mm) x 12” (300mm) and sew along the 12” open edge to make a tube. Turn inside out so that the face side of the fabric is outermost, flatten with seam in the centre and topstitch 3/8″ (1 cm) from either edge. Place the handle on the diameter of the face side of the top circular piece of fabric and sew close to either end. (The seam should be facing down so you cannot see it.) See pictures to make sense of this!

Sewing Handle
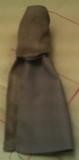
Inside out handle

Top without handle
and with handle
Divide the outer edge of top circle into six parts; mark. Pin (if you wish – upholsterers don’t use pins – too slow!) the upper edge of bag to top circle, right sides together, matching seams of sides to marks on circle. Stitch 1/2″ (1.3 cm) seam. Repeat for the bag bottom, leaving zipper partially opened.
Turn bag right side out through the zipper opening.
Repeat for inner lining but no handle is used here. Insert the lining into outer cover; fill the lining bag with polystyrene bead and either machine or hand sew the opening to prevent the beads escaping.